|
Home > Getting Started > Registration
Registration
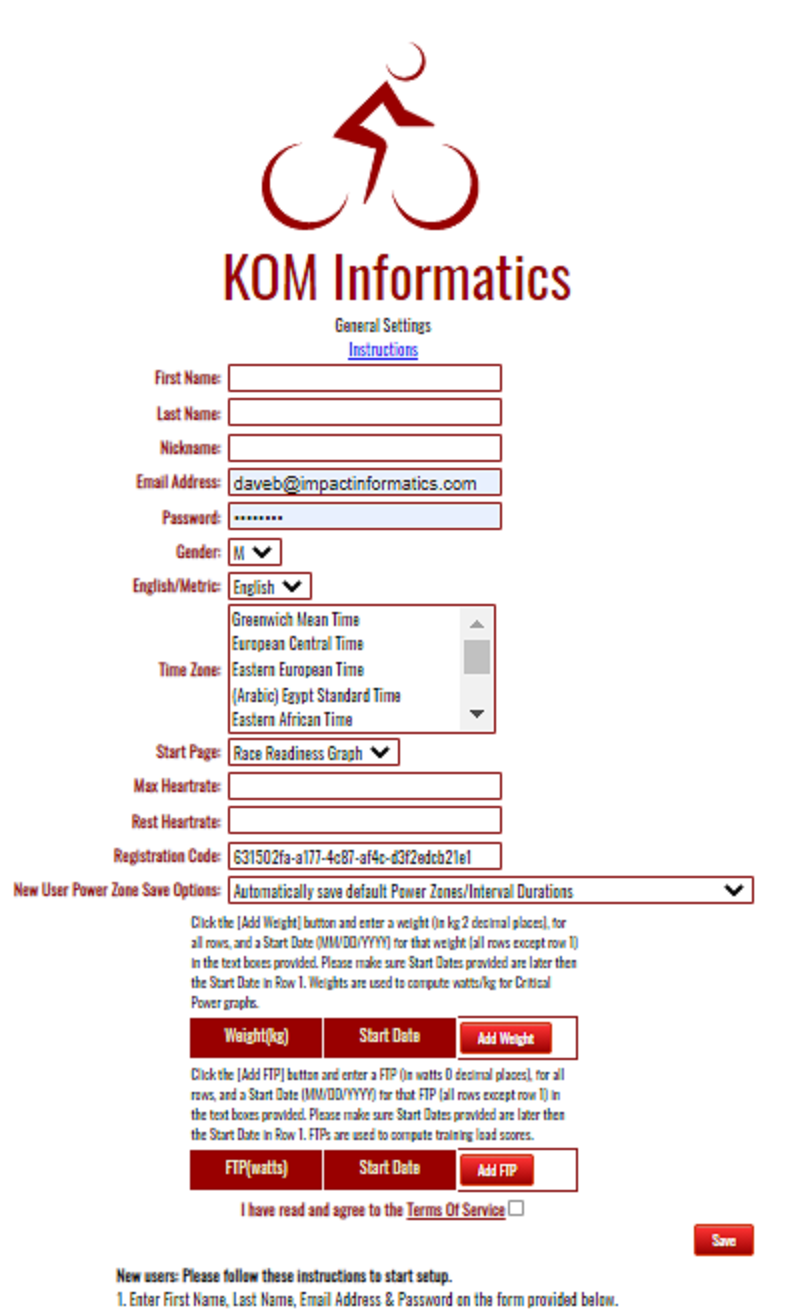
Prior to registration you should know what your ftp is. If you are going to load rides from the past into the system, and your ftp was different at that point in time you should be prepared to enter that ftp as well. The system supports multiple ftps per user which are distinguished by start date. User weight works the same way. You should also know what your Heart Rate Zones are if you want the system to track heart rate for you.
New users: Please follow these instructions to start setup.
- Enter First Name, Last Name, Email Address & Password on the form provided below.
- Fill in a value for the Nickname field. The system uses nickname as a unique identifier for a person which avoids exposing a person's email address so it's important to fill it out.
- Make selections from the Gender, English/Metric, and Time Zone select controls. If you will be uploading .fit files, this specification requires that all times are recorded in UTC (Universal Time). The Time Zone selection enables the application to translate the date/times provided into your local date time. If for some reason you don't want this, select Greenwich Mean Time. No offset will be applied with this selection.
- Pick a start page from the dropdown list. This controls the page you first go to immediately following login.
- Enter in your max heartrate in the box provided. (not required, but needed for VO2Score)
- Enter in your morning resting heartrate in the space provided (not required, but needed for VO2Score)
- Enter the registration code provided to you by Impact Informatics personnel in the space provided unless the system has done so already.
- Select an option from the New User Power Zone Options select list. If you select the first option "Automatically save default Power Zones/Interval durations" then after saving General Setting the system will load the Power Zones page with defaults and save them for you. If you select the second option "Don't automatically save defaults..." You have to go to the power zones page and either save the defaults yourself, or create your own zones and save them.
- Click on the Terms Of Service(TOS) link below to read the Terms Of Service.
- If you agree with the TOS, check the Terms Of Service checkbox.
- Enter in at least one weight in the weight section. (You can enter multiple weights provided the Start Date for those weights are different)
- Enter in at least one FTP in the FTP section. (You can enter multiple values for FTP provided the Start dates for those values are different). Note that you could also use a Critical Power 60 value in place of FTP.
- Click the [Save] button at the bottom of the form.
- After successful processing of your information, the site menu should appear at the top of the screen. You should continue set up by clicking on the Power Zones (if you haven't selected "Automatically save defaults..." from the New User Power Zone Options select list) and Heart Rate Zones links. At least the Power Zones have to be set up prior to uploading any rides.

See also
| 


